Adding FontAwesome to Oracle JET QuickStart
NetBeans 8.1 has a plugin for Oracle JET that makes it absolutely simple to create a project modeled off the Oracle JET QuickStart template. Just choose File >> New Project... >> HTML5/JavaScript >> Oracle JET QuickStart Basic. Give it a name and a location, click Finish, then click the Run Project button.
You should be looking at a three-column, responsive, single-page app with a menubar that swaps out the content in the middle mainContent area. Notice those icons on the menubar for Home, People, Library, etc.:

Those icons come from a custom font named App_iconfont.woff in the /css/fonts/ directory. If you open that font up, you’ll find that it only includes about 10 custom glyphs. What if you need different icons in your menubar?
We can add the awesome FontAwesome project to our QuickStart project and use their myriad of icons in our own menubar.
Get the FontAwesome files
First download the latest zip file from the main FontAwesome page. I’m using version 4.5.0 for this lab.
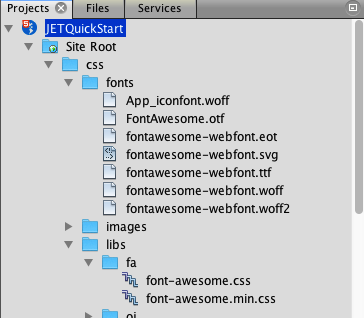
Unzip this file and then pluck out the resources to copy into your JET QuickStart folder hierarchy. Copy the font files in font-awesome-4.5.0/fonts/ to JETQuickStart/css/fonts/. Next, copy the CSS files in font-awesome-4.5.0/css to a newly-created directory at JETQuickStart/css/libs/fa/. Your project should look like this in NetBeans:

Modify the CSS to match OracleJET
We need to tweak the FontAwesome CSS files to point to the proper locations in your project.
Open the JETQuickStart/css/libs/fa/font-awesome.css in NetBeans. Do an Edit >> Replace... and search for the text ../fonts/fontawesome, replacing it with the text ../../fonts/fontawesome. You should get 6 hits. Click Replace All.
Now do the same for the minified version of the file JETQuickStart/css/libs/fa/font-awesome.min.css. If you open it right away in NetBeans, it will remember your Find/Replace strings and you can just click Replace All again.
Close and save both files.
This points the FontAwesome stylesheets in the right direction to find the actual font files in your project structure.
Link everything into your project
Now we need to tell the QuickStart project about the FontAwesome CSS files.
Open the index.html file out of the Site Root by double-clicking on it. Find the line in the <head> section just above the override.css line (line 32 in my file). This is where we will insert the reference to the FontAwesome CSS file.
The easiest way is to grab the font-awesome.min.css file in the Projects hierarchy with the mouse and drag it to the blank line you want to add it into. NetBeans will create the proper <link ... > tag for you. You can add spacing and a comment if you like.

Modify the icons in your menubar code
Everything is in place to use the FontAwesome icons. Now we just need to know what style classes to use and where to put them.
If you are looking to swap out the menubar icons in the QuickStart project, you’ll find the icon style classes are defined in the js/modules/header.js viewmodel. See down in the appNavData definition (lines 92-117) that each menu entry is represented by an object, and each of those objects has a key for iconClass: which is a string that gets passed into the header template and used for the icon styling.
The first entry in that iconClass: string takes the form demo-xxxxx-icon-24 (you can find the CSS that defines these classes in the css/demo-alta-patterns-min file). We’re going to replace that portion of the style with FontAwesome style references.
You can pick the icon you want by perusing the FontAwesome cheatsheet. Drill down on your favorite icon and notice that the class names take the format fa-iconname. We also need to add the fa class to the mix, and I’ve found that playing with the sizes is necessary: I needed fa-lg to make things look right in the QuickStart menubar.
So to swap out the People tab’s icon for something else, remove the demo-education-icon-24 from line 101 of the header.js and replace it with fa fa-users fa-lg:

Revel in your new icons
You’re now using the FontAwesome icons in your menubar for the People tab:

You can now use FontAwesome styles anywhere in your view templates or even build up the same convention as in the QuickStart’s header.js and header.tmpl.html files by passing them in as data-bound elements.
Or if you’re really handy with fonts, you could make your own custom gylphs and set them up similar to the way the QuickStart did, with only the few gylphs you want to include instead of the big FontAwesome files.